Did you know that new folders will be coming out soon? They will be showcased on the Cuttlebug Challenge blog for the next month which you can find right here.

I can’t wait to start seeing the new projects!
Did you know that new folders will be coming out soon? They will be showcased on the Cuttlebug Challenge blog for the next month which you can find right here.

I can’t wait to start seeing the new projects!
I learned this new technique yesterday at Stampfest. The instructor at the Stamp On It booth was showing the many different ways to use your cuttlebug. For this technique, you begin by running a piece of cardstock through the CB using the Distressed Diamond folder. Then take the same piece of cardstock and place it in the Everyday Greetings folder. Run it through the CB four times to get a really good embossing. This second folder will de-emboss the first one making it a background image only.
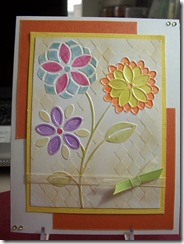
I painted the flowers using Shimmerz paint. Then I sponged Antique Linen ink over the diamonds so they could be seen better. I found some bazzill scraps to use under the image and finished it with a bit of ribbon and rhinestones. This will be a cool technique to try with other folders.
My second card to show today is for a small get together at my Mom’s later this week. A few of her friends wanted to make some cards and this is the first one they will do. I bought the faux postage stamp at the stamp show along with the plastic template.
I began by stamping with versafine black. This ink works really well for fine detail. I laid the plastic template over the top of my stamping and used a stipple brush and Adirondack Butterscotch ink for the background. I took a script background stamp and inked it with Terra Cotta. I stamped off once on paper because I didn’t want a dark image. I stamped my flowers using Tombow markers direct to the stamp. The two sentiments were done using Terra Cotta also. I cut the image out using my Fiskars scissors in the stamp pattern. I layered it with shimmery Bazzill. I am bringing a variety of sentiments so the ladies can choose what type of card they want.
In other news, Pugsly has gone home today and the house is quiet again. Although, I think our little Zoey misses him. The boys made it home today shortly after lunch. They woke up yesterday at 4:00 am and drove from Vermont to New York City. They took in the sights until around 5:00 pm. There was so much construction and traffic it took them 2 hours to get out of the city and into New Jersey. They drove all through the night and are extremely tired. Alex brought me home a nice sized bottle of Maple syrup in the shape of a maple leaf. He said he tried looking for stamp stores, but sadly there were none. At least he thought about me :)
Let me start by saying that my first attempt at a Magnolia card was well received at the swap tonight. Although some ladies asked why I had forgotten to add her mouth…. I tried to explain that she didn’t have a mouth. The discussion thereafter involved MFT Who’s that girl stamps without a head and Amish dolls. We will leave it there.
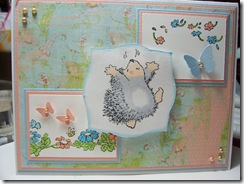
Tonight’s card is for the sketch challenge on Splitcoast. I have good intentions of doing these weekly challenges and finally completed one. The details can be found here. I picked up this stamp set by Penny Black called Wonderful tonight at the store. The main image is stamped on a Label 3 die and colored with copics. I sponged a bit of Colorbox chalk in Ice blue around the die because it looked naked just white, but yet overdone if I layered lit ike the other two rectangles. I stamped just parts of flower images from the same set on the smaller rectangles and colored those with copics also. I used my Martha Stewart butterfly punch for the butterflies and bent their wings for dimension. Kaiser pearls were added to their bodies and along the corners of the card. I love the background paper and hated to cut into it. It is by Karen Foster and called Flowers for Mother. I layered coordinating Bazzill cardstock behind it.
All was quiet when I came home today with the dogs. Actually I think the heat is getting to Pugsly. Here is what he has been doing most of the evening..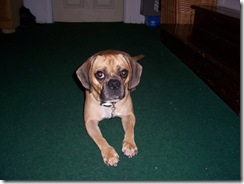
How can I stay mad at that face? We heard from the boys tonight. “They went kayaking and fishing in an awesome lake.” My son is sooo talkative :)
I have finally jumped on the Magnolia stamps craze. The other day I saw a post that the Chasing Butterflies collection was in stock at Scor-Pal. Well, I had to investigate if it involved butterflies. I promptly ordered a few stamps and they arrived yesterday. I created this card for the monthly card swap at my LSS Stamp and Deliver. The theme is Graduation or Summer. I went with the Summer side. 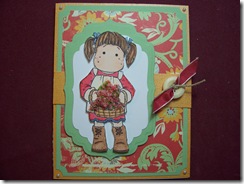
I began by stamping the image in Memento Tuxedo Black ink on Papertrey cardstock. I followed Suzanne Dean’s tutorial on the Scor-Pal website to learn how to color her face and hair with Copics. After she was colored in, I cut out the image and put foam tape behind her to pop her up. I chose the background paper by Foof-a-la which I came across this weekend while organizing my stuff. After picking out the paper, I then chose coordinating cardstock colors to layer it with. I used the two largest Labels 4 dies by Spellbinders to layer the image on top of. I sprinkled Flower Soft Summer instead of coloring in the flowers on the image. To finish the card, I added mini pearls to the ticket punched corners of the card and threaded some hemp through the button to secure a smidgen of red taffeta ribbon. Now to find the right sentiment for the inside…..
On a lighter note we are dog-sitting a Puggle named Pugsly for the week while our son Alex and his friends are in Vermont. This is what I came home to yesterday.
It seems that Pugsly didn’t like our couch. I freaked and promptly took the picture and emailed it up to the boys. We waited and waited for a response. It seems they get no cell phone reception at the cabin they are staying in. Finally, they went to Wal-Mart and Alex saw that I had emailed, called and sent a text. Luckily when Chuck got home he saw that it wasn’t as bad as it looked. There was only a small tear behind the left cushion and he put the stuffing back into the cushion. We have been wanting to change the look of the living room from “country cottage” to a more Floridian look so we will start with the couch. I never liked the couch anyway. We are counting the days until the boys come home.
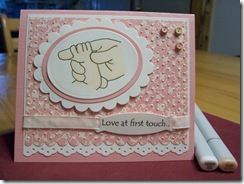
I have been needing to make this baby card for a while now and finally sat down today with a set by GinaK and designed by Melanie M. My cousin in the Boston area is expecting a baby next month. Sadly this didn’t make it in time for the shower last week, but I am sure they will still appreciate it. I began by cutting out the various ovals with my Nestabilities then stamping the image and coloring it with the two Copic colors shown. The ribbon tag is from Spellbinders and the sentiment was added. The ribbon is Vanilla taffeta from SU. The patterned paper is from the DCWV pack called Nana’s Nursery Baby Girl. I ran that through the Cuttlebug using my Swiss Dot folder. I used my scallop and lace border punches from SU to finish the edges. Mini buttons were added as a finishing touch. Now to get to the store for a gift card so I can get this in the mail!
So let’s begin with the new look. I have to say that I was never really happy with the blog background I had before. I loved that it incorporated blue butterflies, but it covered my posts and made you scroll up alot!. So while searching for other backgrounds today, I found joyfulblogskins.blogspot.com . She had this wonderful one that is soooo much cleaner looking AND still has my beloved blue butterfly in the corner. I showed this to Chuck tonight and he was like, finally! I didn’t want to tell you that I never cared for the other as it was very busy. Men, why do I even ask his opinion?!
Now on to the class cards. All the cards were made using one sheet of Penny Black floral stickers. We began by taking all the images off the sheet and putting them on a piece of white cardstock. The image was then cut out. This gave a better backing to the sticker and it was easier to position the image on our cards. The first two above are square cards. The one on the left involved using decorative scissors to cut the image out and simple layering of cardstock. A bow and spiral clip completed the note card. For the one on the right, the image was actually a seven inch sticker that was cut in half and layered on. The sentiment was randomly stamped in Rocket Red and Timber brown inks. There is another birthday sentiment inside, but sorry no photo. As I am looking at the card, I see that my ribbon loop on the right side has been pulled under the layer when I tied the bow :( It is now corrected so when I send the card, the receiver will have a nice balanced card.
One of these cards has a mistake on it but I bet you will never see it. One of the rules of cardmaking is there are no mistakes, just creative maneuvers. The card on the left also used decorative scissors to cut out the image. I used a gold krylon pen to edge it. The card is folded off-center so the strips of cardstock inside can be seen through the punched border. To pinch the ribbon, the prongs of the brad are wrapped around it then poked through the hole. The card on the right used pinking shears to cut the image and sentiment out. It was layered on mulberry paper and paper run through a crimper. Brads and ribbon were added as finishing touches. So do you see my creative maneuver? It is on the left card. The image was supposed to have a scalloped edge. I cut it out backwards and made them inverted. Oh well, Spellbinders is coming out with dies like that now, so it must be the in thing :)
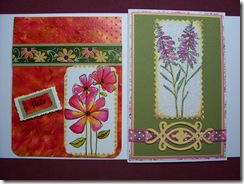 Final two cards from class. Both used fun techniques for two different looks. For the one on the left, we made an alcohol ink background. A strip was cut and run through the Cuttlebug using the swiss dot embossing folder. We used a corner rounder and decorative scissors for the sentiment. The card on the right was made using Stamp N Bond and glitter for the frosted effect. This was layered with textured cardstock and finished off with sheer dotted ribbon and a fancy holder.
Wow, I actually got two posts in one day accomplished. I am off to finish the MFT atc’s from earlier. Please let me know what you think of the new background. If you don’t have a google ID, click on the anonymous button under comments and you can post your thoughts.
 Today's creation is an ATC for a swap on The Stamp Shack. We had to use an image by MFT. No problem there, I have a few of those :) I chose this image as I would like her to be me relaxing after a long day at work. There are a few problems with the picture though....I don't own a brown and white dotted dress and I don't own the furniture either. Now the chocolate is not a problem. I am a Chocoholic!
I took an awesome class a few nights ago at the LSS called Altered Stickers. The instructor Nancy uses one sheet of Penny Black floral stickers and creates wonderful cards. I will try to upload my pictures after work tonight to share with you. I hope you have a wonderful Thursday!
 My first card to show you was made for the swap at my LSS last month. The theme was masculine/Father's Day cards. I used my set from GinaK called Guiding Light. I began with kraft cardstock and stamped the rope image around the four sides with Sahara Sand ink. Then I stamped the main image on white and used my curvy rectangle nestie to cut it out. This was layered on Pacific Point and black cardstock. I colored my images with copics and put just a touch of Shimmerz paint on the seagulls. I cut out the tag with a ribbon diecut from Spellbinders, sponged the edges and used hemp to tie two knots.
The second card is one I will be demoing on Saturday at our monthly make and takes at Stamp and Deliver. I apologize for the blurry picture in advance. The layout is the same one I used during the recent VSN for a five layer card. The paper and colors were changed a bit and brads were used instead of dew drops. Here is a quick tip, if you want to use brads but don't have the color you need, take a sharpie marker in the color you want and color over them. This will permanently change the brad. I couldn't find a sharpie in the color green so i used embossing powder. I heated up plain white brads with my heat gun then dipped them in the powder and re-heat brad for a few seconds. You can make any color you want providing you have the embossing powder :)
The last card I am showing you is the alternate card to show another use for the stamp set at the Make and Take. I used all MFT products on this from the current Chocolate Kiss collection - ribbons, paper and bling.

